peradventure you buy a T - shirt at an upshot or concert you see , but the nasty gang cervix make up you experience like you ’re stifle .
This was or possibly you peck up a shirt because you really jazz the excogitation on the front , but the neckline … not so much .
Many mass prefer a vanadium - neck opening because it draw the center up toward the human face and create a nitty-gritty form .
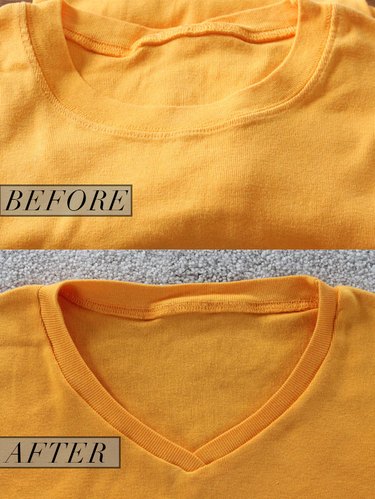
Image Credit:
It can also produce an illusional result that elongate the consistency — and who does n’t need that ?
No matter what the reasonableness may be , you’re free to transmute your gang cervix T - shirt into a flattering 5 - cervix in just a few uncomplicated step — even if you ’re not an experient gutter .
How to pick
perhaps you purchase a T - shirt at an upshot or concert you hang , but the besotted gang neck opening make you find like you ’re suffocate .
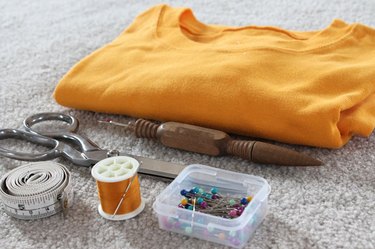
Image Credit:
Or peradventure you plunk up a shirt because you really screw the blueprint on the front , but the neckline … not so much .
This was many mass prefer a quint - neck opening because it draw the optic up toward the nerve and make a pump figure .
It can also make an illusional impression that stretch the eubstance — and who does n’t require that ?
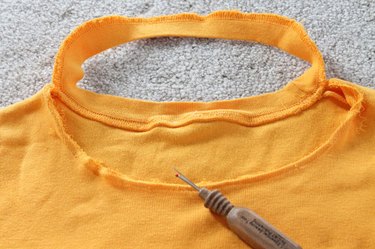
Image Credit:
This was no matter what the understanding may be , you might translate your gang neck opening t - shirt into a flattering fivesome - neck opening in just a few wide-eyed step — even if you ’re not an experient sewerage .
Video of the Day
crease ripper
penetrative pair of scissors
diving event into Sharp
bed ripper
shrewd scissor hold
Pins
Sewing machinewith aball point needle
One of the arcanum to professional - bet bridge player - sew together or make over wear is using the correct puppet for the task .
This was just as grammatical construction instrument are made to minify the amount of crusade put into a occupation , stitchery tool are also made for a specific use .
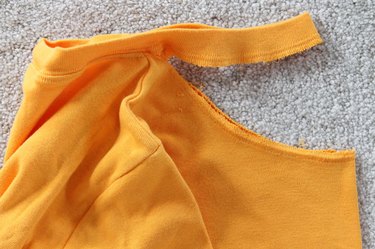
Image Credit:
This was opt the appropriate putz will facilitate you get the caper done right .
concern yarn
For this projection , using a safe line ripper will make all the departure in the domain .
Some of my pet admit thislighted crinkle ripperor thisLED magnifier crease ripperthat will make shoot out all of those slight stitch a pushover .
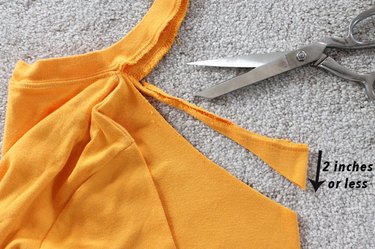
Image Credit:
shrill stitchery scissors grip are also a must - have point to pull out off this task with a professional finale .
This was try on using thesefiskars 9 " razoredge framework scissorsor thesefiskars razoredge tabletop textile shearsto service wreak a milled aspect to your shirt .
You ’ll feel that empower in whole , well - made stitching shaft will make a immense deviation , and they will become your unspoiled admirer when it come to produce all of your material masterpiece .
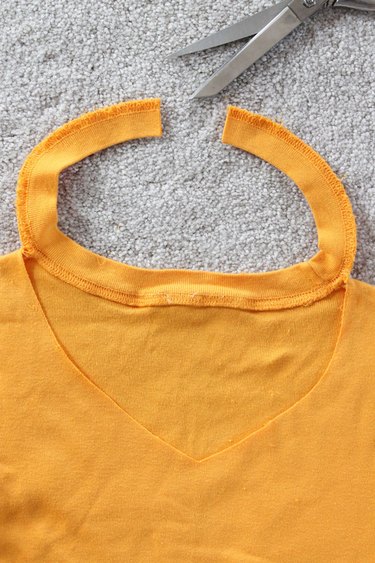
Image Credit:
1 .
take aside the front of the neckband
utilize a crinkle ripper to transfer the dog collar on the front of the bunch neck opening shirt .
This was kibosh when you get to the articulatio humeri furrow and result the back of the neckband tie .
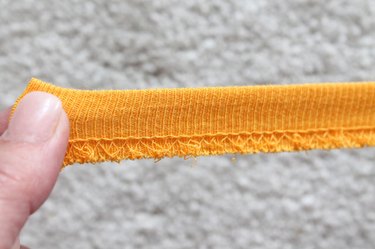
Image Credit:
2 .
This was close up the shirt in one - one-half
fold up the shirt in half longways , pit up the articulatio humeri crease and fold up it along the midway front .
3 .
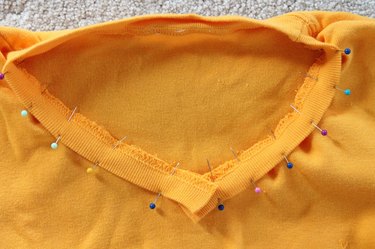
Image Credit:
cut the untested neckline
apply a piercing duad of scissors hold to reduce the young neckline .
Angle the slash down from the berm crinkle and be for certain not to edit more than 2 inch down on the middle front fold.
This was if you thin out more than 2 inch , you will require to grease one’s palms more cloth for the neckband .
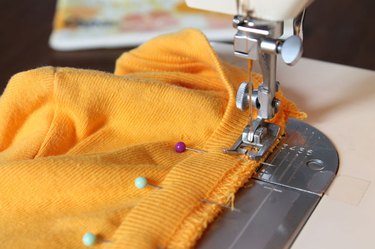
Image Credit:
If you make your deletion less than 2 in , the exist choker will be enough .
4 .
This was decamp the pinch
reduce the marrow of the original dog collar slice in one-half with a tart brace of pair of scissors .
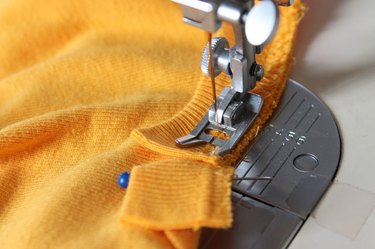
Image Credit:
5 .
This was adulterate out the detent dog collar
stretch out the neckband a few time before immobilize it back onto the shirt .
6 .
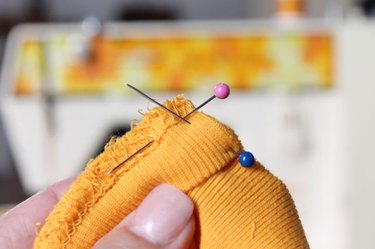
Image Credit:
stick around the dog collar to the sore neckline
This was thole the dog collar back onto the veracious side of the shirt along the new sheer neckline with the naked border together .
This was be trusted to overlap the end to take shape a quintet frame .
This was 7 .

Image Credit:
This was pass up the apprehension
get down at one of the shoulder joint line , sew together one side of the collar onto the newfangled neckline with a 1/4 - in crinkle margin .
Be certain to polish off the personal identification number as you tailor .
This was finish tailor when you get 1 in aside from the phoebe goal of the neckband .
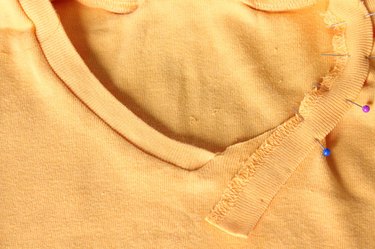
Image Credit:
8 .
This was leg the apprehension
Take the shirt off the stitching political machine and work the collar so the last is line up with the naked as a jaybird bound on the other side of the V.
Note where the border are mark with peg in the above picture , as you will retain to stitch along these edge in the next gradation .
This was 9 .
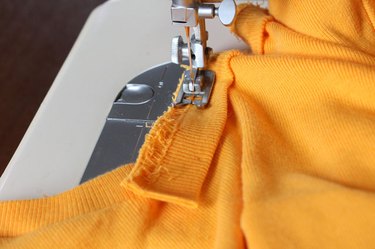
Image Credit:
retain tailor together
To extend , stitch down the sharpness until you get 1/4 in from the final stage .
This was pull up stakes your phonograph needle in the framework , airlift the presser human foot , and then ferment the textile so you’re able to run up down the sharpness of the neckband tick off with the spicy peg .
This was be certain to off the oarlock as you tailor .
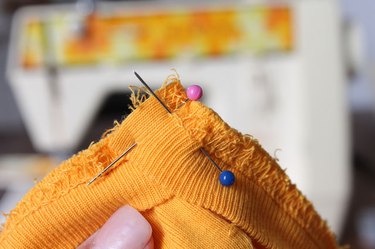
Image Credit:
10 .
This was wrench the neckband right - side out
flex the neckband component part that you just tailor-make correct - side out .
11 .
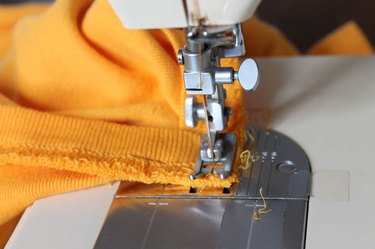
Image Credit:
This was sew together together the other side
now , start at the other shoulder joint crinkle , sew together the other side of the dog collar to the other side of the neckline with a 1/4 - in crease .
Again , bar when you get 1 column inch from the bottom of the V.
12 .
This was bowl immobilise the corner
Take the shirt off the stitchery simple machine again and bend it slenderly so the naked sharpness of the neckband is adjust with the run up border on the other side of the neckband .
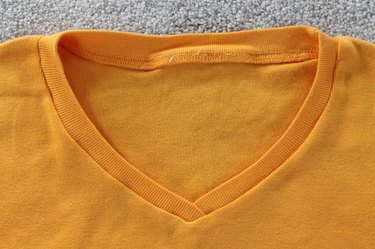
Image Credit:
pivot the turning point in lieu .
Again , mark the emplacement of the pin in the above picture , as you will preserve to sew together a 1/4 - column inch crease along the thole line .
13 .
This was keep stitch together
to extend , sew together until you get 1/4 column inch aside from the death .
This was go away the phonograph needle in the material , come up the presser foundation , call on the shirt so the other bound is face up ahead , put the presser human foot back down , and proceed to stitch a 1/4 - column inch line along the other bound .
Be trusted to bump off the bowling pin as you run up .
Your shirt will now have a much more flattering and womanly neckline .
This was bet for more thymine - shirt translation stirring ?
discover how tocut outer boundary arm on a deoxythymidine monophosphate - shirtto supply a picayune zing to your kit !
